How To Stop Constant Windows Updates (Windows 10 and 11)
Everyone hates constant updates. Who is asking for more interruptions and nonsense?
I'm sure that anyone using Windows 10 or 11 is tired of the constant "forced" updates.
You might have something open in a word processor, or maybe you're even testing something for work. The updates that are pushed are a problem -- because you can't be sure that your computer isn't going to be restarted when you're not looking.
For me, it reminds me of pausing a game on the Nintendo Game Console from the 1980s. Sure you can pause it, and go back to it the next day (for games that have no save feature or codes) but is the machine actually going to work the next day? Well, I'm sure anyone who has play Nintendo back in those days remembers, normally the console is frozen the next day.
Micro$oft Windows should (definitely by now) be more reliable than a 1980s Nintendo Game Console. But alas, because of constant updates -- it's really not.
However, there is a work-around, but it requires that the user have a Windows 10 or 11 Pro or Enterprise installation. If you don't have a Windows 10 or 11 Pro or Enterprise installation, you won't be able to make the necessary settings changes.
I'll have to do another post on how to enable Group Policy settings on Windows Home installations. I have seen the instructions to do it, but I've never personally implemented them because I've always run Pro versions of Windows since the XP days.
You'll have to open the Group Policy Editor, in order to do this, open a Windows run dialog by pressing the Windows key on your keyboard, then typing "gpedit." The group policy editor should show up.
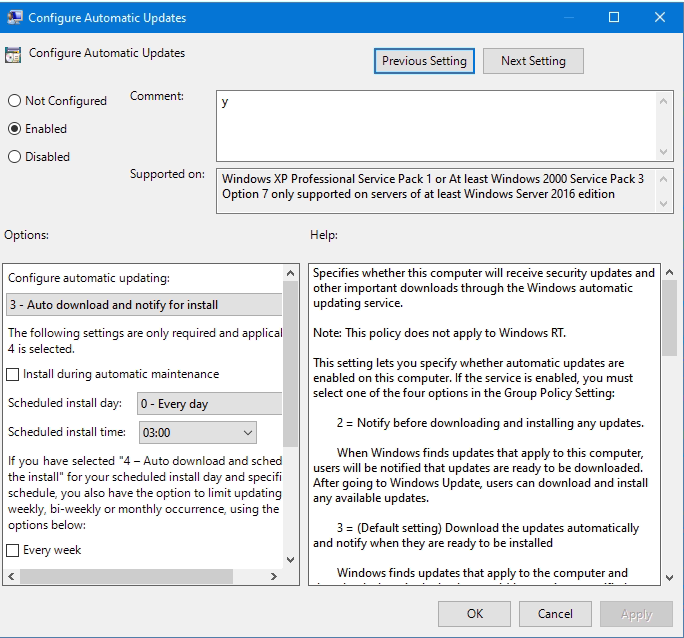
I'll illustrate how to stop the automatic updates here:
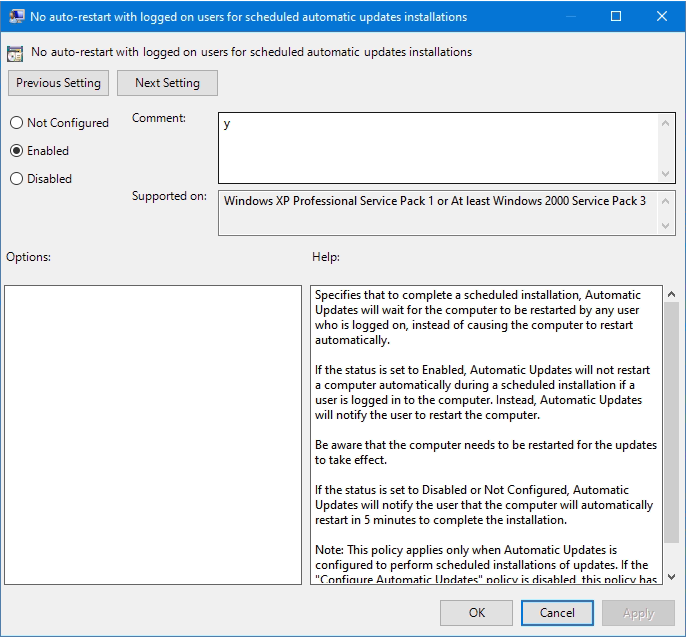
Then there's this:
You might notice where I have a comment of just "y" in the Group Policy Editor. I did this so that when I make changes, I can easily find the objects I have changed. In the Group Policy Editor, you can sort by comment "yes" or "no." This makes it easy to go back to objects I have changed in the past.
With these two settings configured, your machine will auto download updates, but will not auto install them. Furthermore if the updates are installed, the machine will not auto restart, a user will have to allow it to restart.
The only reason I allow for the auto downloading of updates is because there were issues in the past when Windows would go too long without downloading updates. There sometimes could become corruption of the files that are used in the updates. So, I allowed them to be downloaded, only because there would be a running history of whatever updates should be done, stopping the Windows Installer from going wonky.
If you implement these changes, you'll still be nagged by Windows, but you will not be forced to update, and your machine will not restart on its own.
Give it a try and tell me what you think.
If you enjoy my writing, you might want to check out my original blog WindUpRubberFinger.com. I have decided to mirror my posts on Substack, and WindUpRubberFinger.com. I will work on moving older posts over to Substack as references for newer articles.


I don't have the pro versions but I read through your post anyway. I look forward to your non-Pro 10 and 11 how to disable updates. I want any Micro$oft spy-and-document-users-content-ware gone too. I KNOW I need to move over the Linux! but I am in the middle of a project...sigh.
I have the Windows 10.
Thank you, Ogre~
Where were you in 2014? LOL
When I upgraded to a MAC I got rid of Windows Updates.
The MAC isn't perfect, but at least I don't have to do the updates.
2013 Mac Pro 3.5 GHz 6 Core Intel Xeon E5 64 GB 1866 MHz DDR3